I've seen these on various blogs. For the fabric one I printed out a flower pattern and added different sizes so I could have more on my pin. Then for the circle one I just used cups. I used a small circle of felt on the back and stitched on a pin back. Then I just attached the fabric to that through the button and back through the pin back.
The most time consuming thing out of them was making the patterns. I cut them out of paper and then out of a thin cardboard (from a 12 pack of soda). I have been able to reuse the cardboard patterns to cut out my fabric. I'm planning on making quite a few of these for gifts, so I'm going to cut a bunch of fabric out and then just sit down one night to stitch them all together.
Linking to Diary of a Craftaholic
Thursday, December 3, 2009
Custom Resuable Bag
I saw this idea last year in an issue of Family Fun. I bought the iron on paper last year but never had a chance to do the project.
I picked up a reusable bag at Joanne Fabrics. I love their bags, they are big, have a cardboard piece for the bottom, and velcro to keep it shut. Plus they are $1. Can't go wrong with that!
Then I cut a piece of printer paper in half and drew two pictures on them. Then I let Addison color them in. After she was done, I scanned the pictures in as one sheet again. I printed it on the iron on paper and cut it in half.
I followed the directions on the iron on paper that I uesd . One word of advise is to really have your iron on low. It says the lowest cotton setting, well I burned a little hole in my bag. But I wanted to see how it would turn out so I finished it anyway.
I'm definitely going to be picking up more bags so I can use these as gift bags for all of the grandparents. They are not only getting a bag that they can use but one that is personalized.
I'm linking up over at Living with Lindsay http://www.livingwithlindsay.com/?
I'm linking up over at Miss Craft Pants
Thursday, November 5, 2009
Fabric Bracelets
I originally found this idea on UCreate who posted a link for Blue Cricket Design. The tutorial can be found here http://sistersstuff.blogspot.com/2009/10/blog-swap-with-blue-cricket-design.html
These were so easy to do. I actually found a four pack of Sesame Street rubber bracelets on clearance at target for 98 cents. At the time I wished I had bought more, but when making them these are kind of small compared to other rubber bracelets. They fit on my wrist, but my wrist is pretty small. I did also have one other bracelet at home that was regular sized.
I had some fabric that was given to me, so I cut strips from that. I made five of these in less than 30 minutes. I'm definitely thinking of making some of these for Christmas gifts.
Sunday, October 11, 2009
Autumn Gourd
Earlier this week I found two of these paper gourds in my craft stuff. I looked at them and thought well I'm sure I could do something with them. Then a couple of days later I saw a post on Buzzings of a Queen Bee.
I decided to use my gourds to make these. One of them still had a stem attached. I'm trying to decide if I like it with the stem or without better.
Linking up to Thrifty Decor Chick and craftaholics anonymous
I decided to use my gourds to make these. One of them still had a stem attached. I'm trying to decide if I like it with the stem or without better.
Linking up to Thrifty Decor Chick and craftaholics anonymous
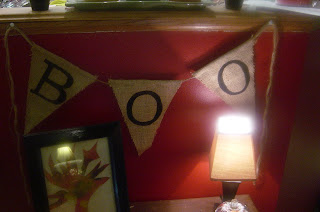
BOO Banner
One of my friends and I found this BOO Banner on Everyday Chaos Blog.
We ended up making four of the banners. We had everything done and just had to glue the pennants. I put it together last night and laid the letters out the wrong way. So instead of BOO I had OOB! Oops!! Since I used hot glue to fold the burlap over the hemp cord I had to cut the top of the pennant off. It still turned out great, even though the pennants are smaller than they should be.
I have it hanging on the front of my kitchen island. I need to finish putting the rest of my Halloween things on the table.
Monday, June 15, 2009
V and Co. Giveaway
Vanessa over at V and Co (click on the title to bring you to her site) is giving away a beautiful necklace by Beki.
Head on over to her webiste to enter. The giveaway is ending on Wed at 11.59 PM.
Tuesday, June 2, 2009
Painting
Well it has been months since my last post. I keep finding many ideas that I want to do, but just haven't found the time. I'm on vacation this week and we aren't leaving until Thursday for our trip. So I put Addison in daycare today and tomorrow and we are painting inside our house. I had painted one wall in January, because we got a new entertainment center, and it needed to be painted before it was put in place.
Today Dustin and I painted for 6.5 hours. We got the first coat on the living room, entry way, hall, and one wall in the dining room. 3 cans of paint!! Then we primed the island and the other wall in the dining room and the kitchen. I was able to get one coat of color on the island and the wall below the cabinets.
Tomorrow we are finishing the first coat of the kitchen/dining color, second coat on the rest and a second coat on the kitchen/dining.
I can't wait until it is done! Dustin told me that I better like the color, because he is never painting again. I do have before pictures and will be posting those.
Subscribe to:
Posts (Atom)